Blog
How to Program a Chamberlain Garage Door Opener: An Expert Guide from Develop Group
Author
Ray
Published
Category
Guide
Learn how to program a Chamberlain garage door opener with expert tips from Develop Group. Follow step-by-step instructions for remotes, keypads, myQ, and troubleshooting.

Author
Ray
An experienced automation specialist with a strong background in motor technology and industrial solutions. With years of expertise in central motors, tubular motors, and automation systems, the author is dedicated to sharing insights that connect engineering innovation with real-world applications. Passionate about advancing reliable, energy-efficient, and high-performance automation products for global markets.
What’s better than insider perks, pro tips, and surprises?
Sign up to get the most recent blog articles in your email every week.
Join now.
WHY I WRITE THIS
About my business
Our company’s main product lines include tubular motors, sliding gate motors, swing gate motors, roller shutter motors, and other door automation solutions, all manufactured by trusted partner factories we have worked with for many years.
Our Services
I help them with sales and export operations, while our company also provides sourcing and procurement services in China to help international clients solve supply-related challenges. If you need assistance with procurement, please feel free to contact us.
Programming a Chamberlain garage door opener is usually a quick process, but the correct procedure depends on the opener model, remote control, wall-mounted door control, and programming technology.
For most compatible Chamberlain systems, the basic process involves activating the opener's Learn or Program mode and then registering the remote control. However, newer Wi-Fi-enabled systems, older Security+ systems, wireless keypads, and certain jackshaft openers can use different procedures.
As a garage door opener manufacturer and industry-focused supplier, Develop Group recommends identifying the opener and accessory before starting the programming process rather than relying on a generic procedure.
This guide explains how Chamberlain garage door opener programming works, how to program a compatible remote, how to program a wireless keypad, what the different Learn button colors mean, how to clear programmed devices, and how to troubleshoot common programming problems.
What You Need Before Programming a Chamberlain Garage Door Opener
Before programming a remote or keypad, identify the garage door opener and the accessory you are trying to program.
You may need:
A compatible Chamberlain remote control
A properly installed battery in the remote
Access to the garage door opener motor unit
A ladder if the Learn button is located on the motor unit
The opener model number
The remote or keypad model number
The manufacturer's programming instructions
Chamberlain states that most remote model numbers can be found on a label on the back of the remote, while keypad model numbers are generally located on the back of the keypad. Checking these model numbers is one of the simplest ways to avoid compatibility problems.
Safety Before You Start
Before programming any device, make sure the garage door area is clear.
Chamberlain recommends staying within sight of the opener during programming because the door may move during the process. Remote controls should also be kept away from children, and the garage door should only be operated when the door can be seen clearly and there are no obstructions.
How the Chamberlain Learn Button Works
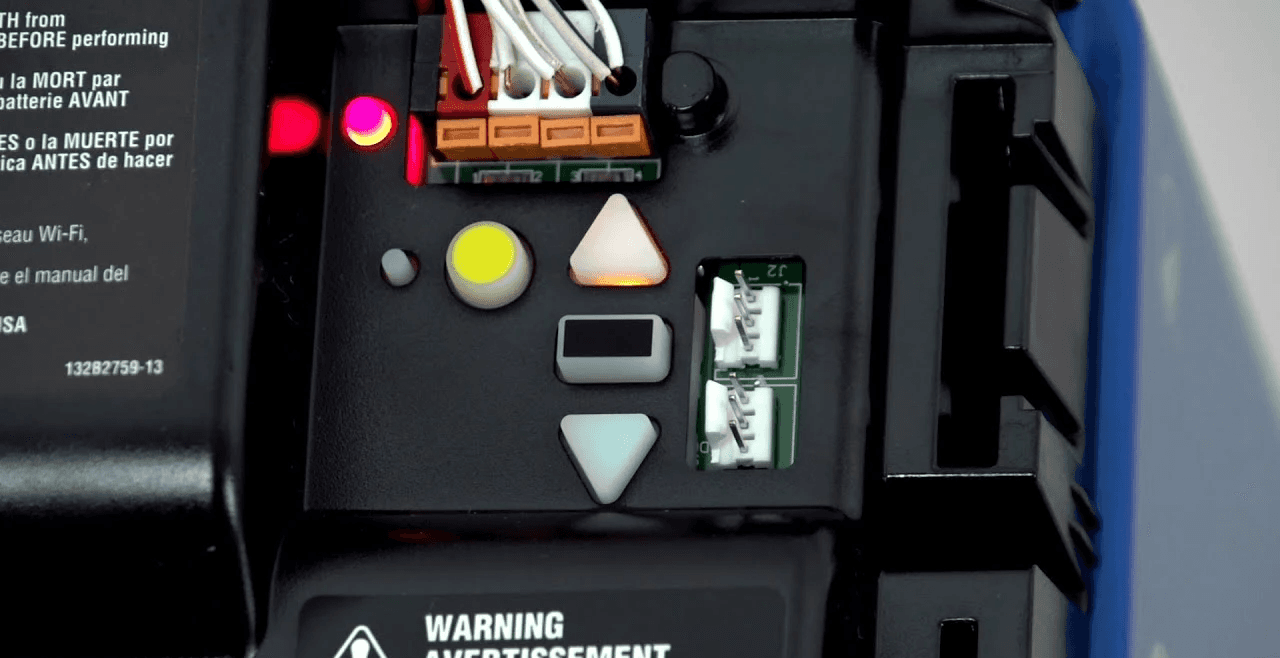
The Learn or Program button is one of the most important controls on a Chamberlain garage door opener.
Depending on the opener model, it can be used to:
Program compatible remote controls
Program wireless keypads
Program compatible myQ accessories
Clear programmed remotes and keypads
Enter certain setup or adjustment modes
Enable Wi-Fi programming on compatible models
Chamberlain's documentation shows that the exact function depends on the Learn button configuration and the opener model.
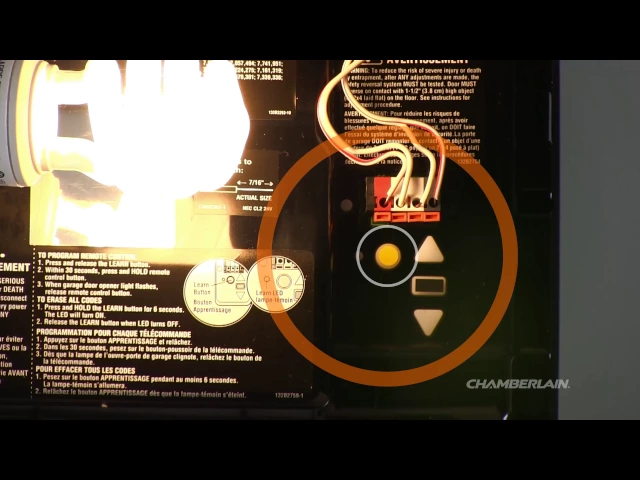
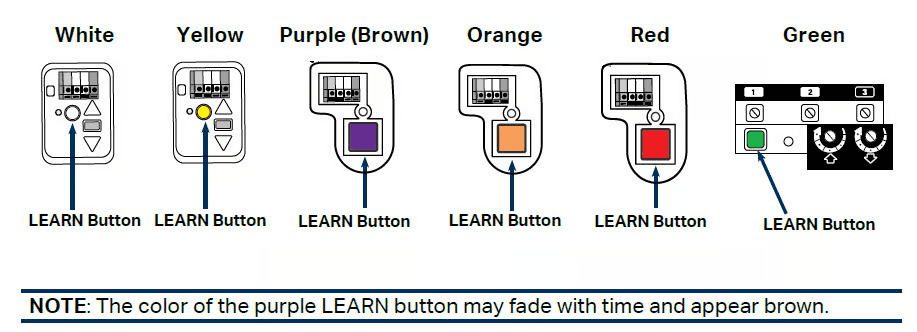
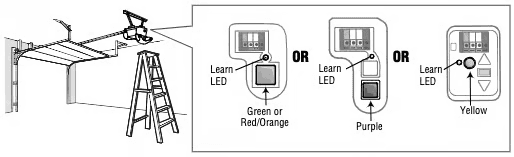
The Learn button is generally located near the antenna wire on the motor unit and may be positioned beneath the light cover. Chamberlain identifies several Learn button colors, including green, red/orange, purple, and yellow.
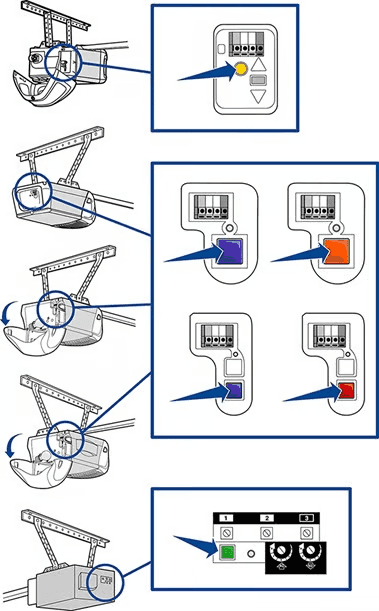
What Do the Chamberlain Learn Button Colors Mean?
The Learn button color can provide useful information about the opener's programming technology.
For many legacy Chamberlain systems, the commonly encountered colors include:
Learn Button Color | Associated Technology |
|---|---|
Yellow | Security+ 2.0 |
Purple/Brown | Security+ 315 MHz rolling code |
Red/Orange | Security+ 390 MHz rolling code |
Green | Billion Code 390 MHz |
Chamberlain's documentation specifically uses these colors to determine the programming sequence for certain legacy 953EV, 956EV, 893MAX, and 890MAX remotes.
However, the Learn button color should not be treated as a universal identification system for every Chamberlain opener. Newer products and different accessory families may use different technologies. Always verify compatibility using the specific opener and remote model.
How to Program a Chamberlain Garage Door Opener Remote
For a compatible Chamberlain remote, the opener's Learn button is one of the most widely applicable programming methods.
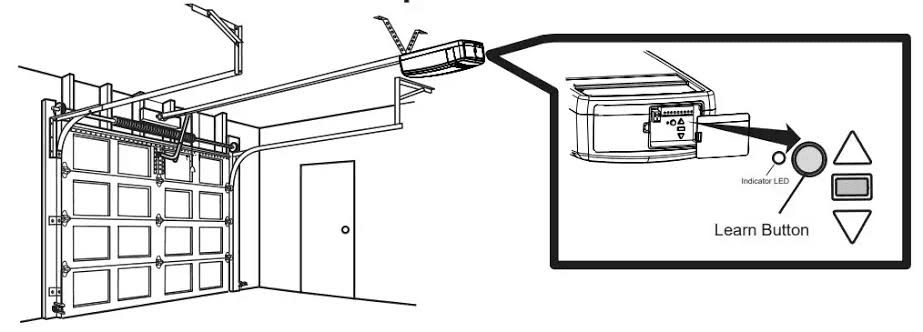
Step 1: Locate the Learn Button
Find the Learn or Program button on the garage door opener.
On many models, it is located near the hanging antenna wire. It may also be located underneath a light cover.
If you need a ladder, position it securely and keep the remote with you so you do not have to move away from the opener during programming.
Step 2: Press and Release the Learn Button
Press the Learn button once and immediately release it.
On many compatible Chamberlain openers, the Learn LED will illuminate steadily, indicating that the opener has entered remote-programming mode.
For openers with green, red/orange, or purple Learn buttons, Chamberlain specifies a 30-second accessory programming window. Yellow Learn button models can have different timing depending on the opener configuration.
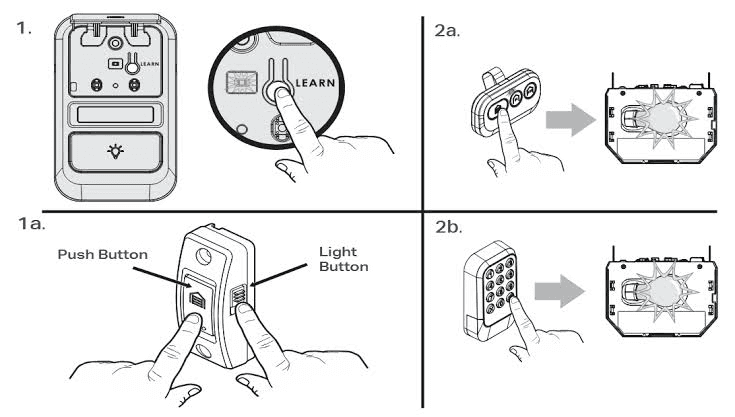
Step 3: Press the Remote Button
Within the programming window, press and hold the button on the remote that you want to program.
Release the remote button when the garage door opener lights flash or when you hear two clicks.
This indicates that the remote has been registered on supported models.
Step 4: Test the Remote
Press the programmed remote button once.
The garage door opener should respond.
If the door does not respond, do not immediately assume that the motor is defective. First check the remote battery, compatibility, programming timing, and Learn button procedure.
How to Program a Chamberlain Remote Using a Wall Control
Some Chamberlain systems provide a Learn button on the wall-mounted door control.
When supported, the general procedure is:
Locate the Learn button on the wall control.
Press and release the Learn button.
Press and release the Learn button again.
Confirm that the LED is flashing.
Within the programming window, press and hold the desired button on the remote.
Release the remote button when the opener lights flash or two clicks are heard.
Test the remote.
Chamberlain's current programming instructions specify this two-stage Learn-button procedure for compatible wall controls.
This method is particularly useful when the opener motor unit is difficult to access.
How to Program a Chamberlain Garage Door Opener With myQ
Some newer Chamberlain garage door openers include Wi-Fi and myQ functionality.
For compatible systems, programming can be performed through the myQ ecosystem or through a compatible control panel.
Chamberlain indicates that Wi-Fi-enabled openers can often be identified by a Wi-Fi or "Powered by myQ" logo.
For a compatible system, the general workflow is:
Confirm that the garage door opener is connected to the appropriate myQ account.
Open the myQ app or use the compatible control panel.
Enter the appropriate programming mode.
Select the remote or accessory programming option.
Press and hold the desired button on the remote.
Wait for the opener lights to flash or for two clicks.
Test the remote.
The exact interface and sequence vary by product generation, so users should follow the instructions for the specific opener and control panel rather than assuming every myQ opener uses the same menu structure.
How to Program a Chamberlain Wireless Keypad
A wireless keypad is programmed differently from a handheld remote.
For example, Chamberlain's 940EV wireless keypad requires the user to:
Press and hold the
*and#buttons until the keypad stops blinking.Enter a four-digit PIN.
Press the
#button.Select the appropriate opener type using the keypad.
Press the Learn button on the garage door opener.
Enter the programmed PIN.
Press Enter until the opener lights flash or two clicks are heard.
Test the keypad.
These steps are specific to compatible 940EV-series keypads; other Chamberlain keypad models can use different programming procedures.
Chamberlain's current keypad lineup also includes newer Security+ 3.0 and myQ-compatible models, so identifying the keypad model before programming is important.
How to Program a Chamberlain Remote for an Older Opener
Older Chamberlain garage door openers can require a different remote-programming sequence.
For certain 953EV, 956EV, 893MAX, and 890MAX remotes, Chamberlain specifies different button-press sequences depending on the Learn button color.
For example:
Yellow Learn button: one remote-button press
Purple/Brown Learn button: two presses
Red/Orange Learn button: three presses
Green Learn button: four presses
The sequence is part of the remote's programming process and should not be applied to every Chamberlain remote or opener.
This is one reason why checking the opener model and remote model is more reliable than searching only by the general term "Chamberlain garage door opener."
What to Do If the Chamberlain Remote Will Not Program
A remote that does not program does not necessarily indicate a failed garage door opener.
Use the following troubleshooting sequence.
1. Check the Remote Battery
Make sure the battery is installed correctly.
If the battery is old or weak, replace it before repeating the programming procedure.
2. Confirm Compatibility
Not every Chamberlain remote works with every Chamberlain opener.
Chamberlain maintains separate compatibility information for current and legacy remote controls. The remote model number and opener model number should be checked before assuming the devices are compatible.
3. Check the Learn Button
Make sure you are pressing the correct Learn or Program button.
The button may be located on the motor unit, wall control, or myQ control panel depending on the opener configuration. Certain models, including the 8500 and RJO20, require programming through the myQ Control Panel rather than the opener motor unit.
4. Repeat the Programming Process
Programming windows are limited.
For many compatible systems, the remote must be programmed within approximately 30 seconds after the Learn button is activated.
If the window expires, start the procedure again from the beginning.
5. Check Whether the Opener Memory Was Cleared
If all previously programmed remotes suddenly stop working, the opener memory may have been cleared.
Chamberlain notes that holding the Learn button for approximately six seconds can erase programmed remote controls and keyless entries on compatible models.
If this happens, all required remotes and keypads need to be programmed again.
How to Erase Chamberlain Garage Door Opener Remote Controls
Erasing the opener's memory is useful when a remote has been lost, when moving into a new property, or when all existing access codes need to be removed.
For compatible systems, Chamberlain's procedure involves holding the Learn button until the LED turns off, which takes approximately six seconds.
After the memory has been cleared, previously programmed remotes and keypads will need to be programmed again.
Important Difference With Yellow Learn Button Systems
Some yellow Learn button openers have additional myQ accessory memory.
Chamberlain documents separate procedures for clearing handheld remotes/keypads and clearing myQ accessories. On applicable models, the second memory-clearing sequence must be initiated within a specified period after the first one.
Therefore, users should not assume that one memory-reset procedure erases every type of connected device.
Chamberlain Remote Works but Garage Door Does Not Close
If the remote works but the garage door will not close, the problem may not be related to remote programming.
One important area to check is the safety reversing sensor system.
If the sensors are blocked or misaligned, the opener may prevent the door from closing. Chamberlain's troubleshooting documentation also identifies sensor alignment and wiring as possible causes.
Check that:
Nothing is blocking the sensor path.
The sensors are properly aligned.
The sensor LEDs indicate normal operation.
The sensor wiring is connected correctly.
Do not bypass or permanently disable the safety system simply to make the door close.
Chamberlain Garage Door Opener Programming vs. Travel Programming
It is important to distinguish remote programming from travel-limit programming.
Programming a remote tells the opener which wireless control signal to recognize.
Programming travel limits tells the opener where the garage door should stop in the fully open and fully closed positions.
These are separate functions.
For example, Chamberlain's Security+ 2.0 and myQ-enabled openers use adjustment controls to program the UP and DOWN travel positions, while force adjustment is handled as part of the opener's setup.
If a garage door opens or closes only partially, reverses unexpectedly, or stops at the wrong position, repeatedly programming the remote will not solve the underlying problem.
The travel limits, force settings, door balance, or safety sensors may need to be checked instead.
When a Garage Door Opener Needs More Than Reprogramming
Programming is only one part of garage door opener operation.
If a door repeatedly reverses, binds, stops unexpectedly, or makes unusual noises, inspect the overall door and opener system rather than continuously resetting the remote.
Chamberlain recommends checking the condition and movement of the door and stopping use when the door is damaged, difficult to operate, sticking, binding, or moving unevenly. It also advises against attempting repairs or adjustments to high-tension springs, cables, rollers, and related hardware without appropriate professional assistance.
For a malfunctioning opener, the issue may involve:
Remote control
Receiver
Logic board
Wall control
Safety reversing sensors
Travel settings
Force settings
Motor or drive system
Door hardware
A systematic diagnosis is more effective than repeatedly programming the remote.
How to Test the Garage Door Opener After Programming
After programming a remote, test the door under normal operating conditions.
First, make sure there are no people, vehicles, or objects in the door's travel path.
Then:
Close the garage door.
Press the programmed remote button.
Observe the complete opening cycle.
Press the remote again to close the door.
Watch the complete closing cycle.
Confirm that the door stops at the intended positions.
If any adjustment has been made to travel, force, or the garage door system, the safety reversal system should also be tested.
Chamberlain recommends placing a 1-inch board or a 2 × 4 laid flat on the floor beneath the door and operating the door downward. The door should reverse when it contacts the obstruction. Chamberlain states that this safety reversal test should be performed monthly and after adjustments.
Why Correct Programming Matters for Garage Door Opener Manufacturers
From a manufacturer's perspective, programming is more than a convenience feature.
A modern garage door opener may need to coordinate several control interfaces, including:
Handheld remotes
Wireless keypads
Wall controls
Vehicle-integrated controls
Smart-home interfaces
Wi-Fi-connected control systems
The control architecture therefore needs to balance usability, compatibility, security, and safety.
For OEM and private-label garage door opener projects, buyers should evaluate not only the motor and mechanical structure but also the complete control system and accessory ecosystem.
What to Look for in a Garage Door Opener Manufacturer
For distributors, installers, importers, and brands sourcing garage door openers, several technical factors should be evaluated before selecting a manufacturing partner.
Motor and Drive Configuration
The opener should be matched to the garage door type, door weight, travel requirements, and expected operating frequency.
Control and Programming System
Consider how remotes, keypads, wall controls, and optional smart functions are programmed and managed.
Safety System
Safety reversing sensors, obstruction detection, travel control, and force management should be considered as part of the complete opener system.
Compatibility
The opener should support the accessories and control interfaces required by the target market.
OEM and ODM Support
For distributors and garage door companies, OEM/ODM capabilities can be important when developing private-label garage door opener products.
Quality Control and Testing
A professional manufacturing program should include component inspection, assembly quality control, functional testing, and appropriate product documentation.
Develop Group's Approach to Garage Door Opener Solutions
At Develop Group, garage door opener selection should be considered as a complete system rather than simply a motor selection.
For OEM, distributor, and project applications, the key considerations include the garage door configuration, motor and drive system, control method, safety requirements, operating conditions, and target-market requirements.
A suitable opener should provide reliable door movement while offering a control architecture that is practical for installers and end users.
When replacing an existing Chamberlain system, the goal should not simply be to find a motor that physically fits. The replacement system should also be evaluated for door compatibility, control requirements, installation conditions, safety functions, and long-term serviceability.
Frequently Asked Questions
How do I program a Chamberlain garage door opener remote?
For a compatible opener, press and immediately release the Learn button, then press and hold the desired button on the remote within the programming window. Release the remote button when the opener lights flash or two clicks are heard. The exact process depends on the opener and remote model.
How long do I have to program a Chamberlain remote after pressing Learn?
Many compatible Chamberlain openers provide approximately 30 seconds of remote-programming time. Some yellow Learn button systems have different programming behavior, so the opener model should be checked.
What does the Learn button do on a Chamberlain garage door opener?
Depending on the model, the Learn button can program remotes and keypads, program certain accessories, clear memory, and enter other setup modes. Wi-Fi-enabled models can have additional functions.
Why won't my Chamberlain remote program?
Check the battery, compatibility, Learn button location, programming timing, and whether the opener's memory has been cleared. If another programmed remote also fails, the problem may involve the opener rather than the original remote.
Can I program a Chamberlain garage door opener without the motor unit?
Some compatible Chamberlain systems allow programming through a wall-mounted control, control panel, or myQ system. However, the available method depends on the opener and accessory.
How do I erase all Chamberlain remotes?
On compatible models, hold the Learn button until the LED turns off, which is approximately six seconds. This clears programmed remote controls and keyless entries. The exact procedure can vary for myQ accessories and different opener configurations.
Why does my Chamberlain garage door open but not close?
A blocked or misaligned safety reversing sensor is one possible cause. Check the sensor path, alignment, wiring, and indicator LEDs. Do not bypass the safety system.
Do I need to reprogram the remote if I unplug the opener?
Not necessarily. Chamberlain states that unplugging an opener for an extended period does not by itself erase programmed remotes.
Is programming a garage door opener the same as setting travel limits?
No. Remote programming registers a control device with the opener. Travel programming establishes the open and closed positions of the garage door. They are separate procedures.
Final Takeaway
Programming a Chamberlain garage door opener is generally simple when the correct remote and opener are compatible. The most reliable approach is to first identify the opener and accessory, locate the correct Learn or Program button, follow the model-specific programming sequence, and test the system afterward.
For installers, distributors, and OEM buyers, however, reliable garage door opener performance involves more than remote programming. Motor selection, drive configuration, control architecture, safety systems, compatibility, testing, and long-term serviceability all need to be considered as part of the complete garage door opener system.
Develop Group provides garage door opener solutions for businesses looking for reliable motor systems, OEM/ODM cooperation, and professional manufacturing support.
Other Blogs