
Blog
Roller Shutter Motor Installation Guide: Step-by-Step Setup, Wiring & Safety Tips
Author
Ray
Published
Category
Roller Shutter Motor
Learn roller shutter motor installation, wiring basics, limit setting, and key safety tips for a smoother, safer setup.


Author
Ray
An experienced automation specialist with a strong background in motor technology and industrial solutions. With years of expertise in central motors, tubular motors, and automation systems, the author is dedicated to sharing insights that connect engineering innovation with real-world applications. Passionate about advancing reliable, energy-efficient, and high-performance automation products for global markets.
What’s better than insider perks, pro tips, and surprises?
Sign up to get the most recent blog articles in your email every week.
Join now.
WHY I WRITE THIS
About my business
Our company’s main product lines include tubular motors, sliding gate motors, swing gate motors, roller shutter motors, and other door automation solutions, all manufactured by trusted partner factories we have worked with for many years.
Our Services
I help them with sales and export operations, while our company also provides sourcing and procurement services in China to help international clients solve supply-related challenges. If you need assistance with procurement, please feel free to contact us.
A proper roller shutter motor installation is not just about putting a motor into a tube and connecting a few wires. The installation works best when the motor torque matches the shutter load, the tube and drive components fit correctly, the wiring is completed safely, and the travel limits are set accurately. Manufacturer guides from Nice and Somfy both stress that the motor must be selected for the shutter’s size and weight, fitted correctly into the roller tube, and adjusted carefully before final use.
Key Takeaways
Start by confirming the motor is suitable for the shutter’s size, weight, and torque requirement. Nice’s tubular motor instructions explicitly say the motor version must match the shutter dimensions and weight.
For tubular systems, the motor must be fitted correctly inside the tube and secured with the correct fasteners. Somfy installation instructions describe fitting the motor into the tube and securing the drive wheel and end plug with steel rivets or screws.
Roller shutter motor wiring should be completed by suitably qualified personnel. Nice’s industrial roller shutter documentation states that only suitably qualified persons should install, repair, or service the equipment.
Limit setting is a critical step. Nice’s shutter guides show that upper and lower limit switches must be programmed or adjusted according to the installation type.
Good safety practice includes clearing the work area, keeping controls properly positioned, and testing the system before final handover. Nice documentation instructs installers to position buttons to the side of the shutter and at least 1.5 m from the floor on some models.
Featured snippet block: quick answer
How do you install a roller shutter motor?
Confirm the motor torque matches the shutter size and weight.
Prepare the roller tube and shutter assembly.
Fit the motor into the tube with the correct crown and drive.
Secure the motor and end plug correctly.
Complete the wiring according to the motor and control type.
Set the upper and lower travel limits.
Test operation and safety before handover.
What a roller shutter motor installation involves
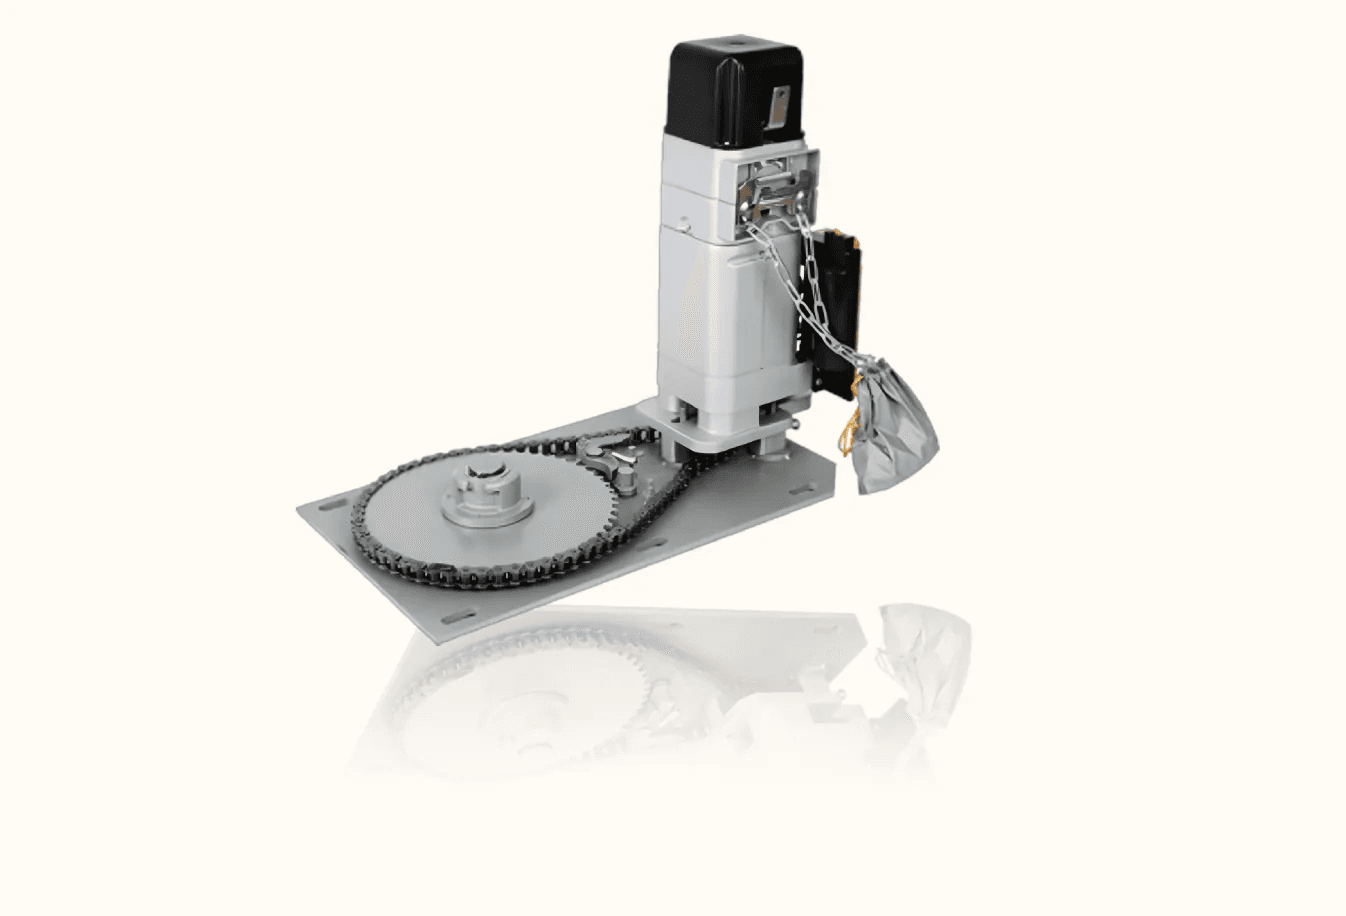
Most roller shutter motor installations use a tubular motor mounted inside the roller tube. Somfy and SIMU product materials describe this as a discreet solution that reduces the total rolled diameter and supports installation inside the shutter shaft. Some product ranges cover different tube diameters and torque classes, which is why correct sizing comes first.
The job usually involves two sides of work:
mechanical installation, which includes tube fit, motor mounting, and curtain alignment
electrical setup, which includes wiring, control connection, and limit adjustment
A strong installation gets both sides right.
Before you start: 5 pre-installation checks
1. Confirm motor torque and shutter weight
Do not begin with wiring. Begin with sizing. Nice’s tubular motor manual states that each motor version has a specific torque and is designed to move shutters of certain dimensions and weights, and it tells installers to confirm suitability before installation.
That makes torque selection the first real installation step. A motor that is too small may struggle or overheat. A motor that is oversized for the application may also be an improper match.
2. Check tube size and hardware fit
Tube compatibility matters. Somfy documents for tubular motors show that the motor must be fitted into the correct round tube and secured properly with the correct drilling length and fasteners. Somfy and SIMU product materials also show multiple motor diameters, which reinforces that there is no one-size-fits-all tube format.
3. Confirm power supply and control type
Motor literature shows that shutter motors can vary by power supply and control arrangement. Somfy’s DMI6 materials, for example, specify a 230 V / 50 Hz supply for the cited product. Before installation, confirm the electrical characteristics of the exact model you are using rather than assuming all shutter motors wire the same way.
4. Inspect the shutter condition
A motor cannot compensate for a badly aligned or damaged shutter. Before installation, make sure the shutter runs freely, the guides are not binding, and the barrel and curtain are in sound condition. This is a practical installation rule inferred from manufacturer emphasis on correct application fit and safe operation.
5. Plan a safe installation area
Nice’s installer documentation says only suitably qualified persons should install or service the product and warns that incorrect installation or misuse may cause serious harm. That is enough reason to treat the work area seriously: isolate power, secure the shutter, and keep unnecessary personnel away from the opening during setup.
Step-by-step roller shutter motor installation
Step 1: Prepare the shutter and tube
Start by opening the shutter assembly and preparing the roller tube. Remove any existing manual mechanism if applicable, check the tube condition, and confirm the crown and drive match the motor. Somfy’s tube-fitting instructions emphasize measuring the drilling length correctly for the motor type before fitting it into the tube.
Step 2: Fit the motor into the tube
Insert the motor carefully into the roller tube, making sure the tube notch aligns with the raised key on the crown wheel. Somfy’s instructions specifically describe sliding the tube notch over the crown-wheel key and then securing the drive wheel to the tube.
This is one of the most important mechanical steps. A poor fit here can affect smooth operation, torque transfer, and long-term reliability.
Step 3: Mount the assembly securely
Once the motor is seated in the tube, fit the end plug on the opposite side and secure the assembly with the specified fasteners. Somfy’s instructions call for steel rivets or screws for the drive wheel and end plug, and specifically note steel grades SAE 5 or higher for the relevant fasteners.
At this stage, confirm the barrel rotates freely and the shutter curtain is aligned.
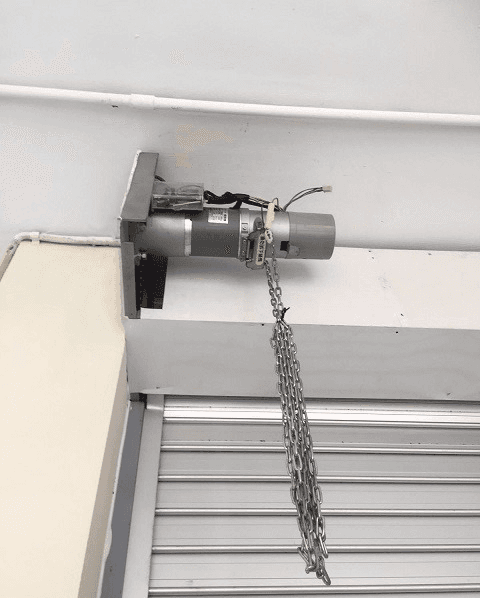
Step 4: Complete roller shutter motor wiring
This is where many users search for roller shutter motor wiring, but there is no universal diagram that fits every model. Control scheme, supply voltage, switch type, and integrated features all vary by product.
What does stay consistent is the safety principle: electrical connection should be handled by qualified personnel. Nice’s industrial roller shutter instructions state that only suitably qualified persons may install, repair, or service the equipment. Somfy also recommends testing the motor and setting limits before making the final electrical connection in one of its installation documents.
So the right advice is this: follow the exact wiring diagram for the motor and control unit you are installing, rather than relying on a generic internet sketch.
Step 5: Set upper and lower limits
Limit setting tells the motor where to stop in the open and closed positions. Nice’s shutter documentation shows that the programming procedure depends on the installation type and whether the system uses safety plugs or rigid anti-intrusion springs. The same documentation explains that some applications are best set manually and others automatically or semi-automatically.
Other Nice instructions also note that the adjustment sequence can differ depending on whether the motor is used for roller shutters or awnings.
This is why limit setting should never be rushed. It is one of the most installation-specific parts of the job.
Step 6: Test operation and safety
After setup, run the shutter through a full open-close cycle and confirm:
smooth travel
correct stop positions
no unusual noise or binding
correct response from wall switch or controls
safe behavior at both end positions
Nice documentation also requires installer instructions to be handed over to the responsible end user during handover.

Roller shutter motor wiring: what installers need to know
The phrase roller shutter motor wiring covers several different realities: simple up/down wall switches, integrated controls, remote receivers, and larger commercial door systems.
A useful installation rule is to separate the concept into three checks:
power input must match the motor specification
control method must match the wiring design
limit setup must be completed before final handover
Nice’s documentation also notes practical details such as placing pushbuttons to the side of the shutter and at least 1.5 m from the floor for certain systems.
That is a small detail, but it reflects a larger truth: wiring is not only about electrical connection. It is also about safe and practical control placement.

Common installation mistakes to avoid
Several installation mistakes appear again and again.
The first is choosing a motor without checking torque suitability. Nice’s instructions explicitly warn installers to confirm the motor parameters are suitable for the shutter before installation.
The second is assuming any tube will work with any motor. Somfy materials clearly show that tube fit and drilling dimensions depend on the motor type.
The third is treating wiring as universal. It is not. Wiring depends on the exact motor, control device, and power supply.
The fourth is rushing the limit adjustment. Nice’s support materials make it clear that different shutter configurations require different limit-setting procedures.
Safety tips that matter during installation
Safety is not an add-on. It is part of correct installation.
Nice’s installer manual states that incorrect installation or misuse may cause serious harm and that only suitably qualified persons may install or service the product.
A practical safety checklist includes:
isolate electrical power before wiring work
support the shutter and barrel securely during fitting
keep hands clear of moving curtain sections and side guides
test travel with a controlled approach before normal use
place controls in safe, accessible locations
stop immediately if the shutter binds, twists, or overruns limits
These are common-sense measures, but they are exactly the kind of details that make a professional installation feel different from an improvised one.
Final takeaway
A successful roller shutter motor installation depends on four things: correct motor selection, correct mechanical fitting, safe wiring, and careful limit setting. If any one of those steps is weak, the whole installation becomes less reliable.
The most useful way to approach the job is to treat it as a system, not a parts swap. Confirm torque first. Confirm tube fit second. Complete wiring to the exact product diagram. Then set and test limits with care. That approach aligns with what manufacturer documents consistently show across tubular motor and industrial shutter guides.
For China-Develop, this article naturally supports a soft CTA: guide buyers toward motor selection, wiring support, and product-specific installation resources rather than asking them to guess from one generic setup diagram.
FAQ about install a roller shutter motor
1. How do you install a roller shutter motor?
In general, you choose the correct motor for the shutter, fit it into the tube, mount the assembly securely, complete the wiring safely, and then set the upper and lower travel limits. Manufacturer instructions consistently stress motor suitability, correct fitting, and proper adjustment.
2. Can I wire a roller shutter motor myself?
Electrical connection should be handled by a suitably qualified person. Nice’s installer documentation states that only suitably qualified persons may install, repair, or service the product.
3. How do I set the limit switches on a roller shutter motor?
The exact method depends on the motor and shutter configuration. Nice support materials show that some systems use manual adjustment, while others use automatic or semi-automatic procedures depending on safety plugs and anti-intrusion springs.
4. What is the most common mistake in roller shutter motor installation?
One of the most common mistakes is choosing the wrong motor torque for the shutter size and weight. Nice’s instructions specifically tell installers to confirm suitability before installation.
5. Do all roller shutter motors use the same wiring method?
No. Wiring varies by motor model, power supply, and control type. That is why installers should always use the exact product wiring instructions for the motor being installed.
6. Where should roller shutter controls be installed?
For some Nice systems, the pushbuttons should be placed to the side of the shutter and at least 1.5 m from the floor. Exact placement can vary by product and local requirements
Other Blogs


